
Sore Back After Sitting? Fix Your Desk Setup in 10 Minutes
A sore back after sitting is one of the most common “quiet” problems of modern work. The tricky part is that it often feels like it comes out of nowhere, when i...
Jan 31, 2026

A sore back after sitting is one of the most common “quiet” problems of modern work. The tricky part is that it often feels like it comes out of nowhere, when in reality it builds up from small, repeated stresses: a chair that tips your pelvis backwards, a screen that pulls your head forwards, or a keyboard position that locks your shoulders up.
The good news is that you can usually make a noticeable difference fast. Below is a practical, 10-minute desk setup reset you can do right now, using what you already have.
If your back pain is severe, follows a fall/accident, or comes with symptoms like numbness, weakness, or changes to bladder or bowel control, seek urgent medical advice.
Why sitting can trigger a sore back
Sitting is not inherently “bad”, but it is a position where the body tends to drift into end-range postures: the pelvis tucks under, the lumbar spine rounds, the ribcage collapses, and the head moves forwards. Over time, that combination can increase sensitivity in the joints, discs, muscles, and nerves around the lower back and hips.
Ergonomics also matters because it changes how much your body has to work just to stay upright. Even small improvements can reduce load and help you tolerate sitting better.
UK employers often frame this under DSE (Display Screen Equipment) best practice. The UK Health and Safety Executive (HSE) guidance is clear that workstation setup should fit the user, not the other way round.
Your 10-minute desk setup reset (do it in order)
Think of this like a quick “alignment audit”. Each step builds on the previous one.
Minute 1: Reset your “base” (feet, hips, chair position)
Sit all the way back so your pelvis is supported by the backrest (not perched on the edge).
Place your feet flat on the floor.
Bring your chair close enough that you are not reaching for the keyboard.
Quick check: your shins should be roughly vertical, and your knees should be around hip height or slightly lower. If your chair is too high to allow feet-flat, use a stable footrest (even a sturdy box or a stack of books).
Minute 2: Adjust seat height (and reduce pressure behind the knees)
Raise or lower the chair so you feel evenly balanced on your sit bones (not sliding forwards, not slumping backwards).
If your chair has a deep seat pan and it presses into the back of your knees, pull your pelvis fully back and leave a small gap between the seat edge and the back of your knees.
Minute 3: Set the backrest (support, not a recline nap)
Aim for a backrest angle that supports you while still feeling “ready to work”. For many people this is a slight recline, not bolt upright, and not far back.
If you have adjustable lumbar support, position it so it supports the curve of your lower back rather than pushing you forwards excessively.
No lumbar support? Add a small cushion or a rolled towel at belt height to reduce sustained slumping.
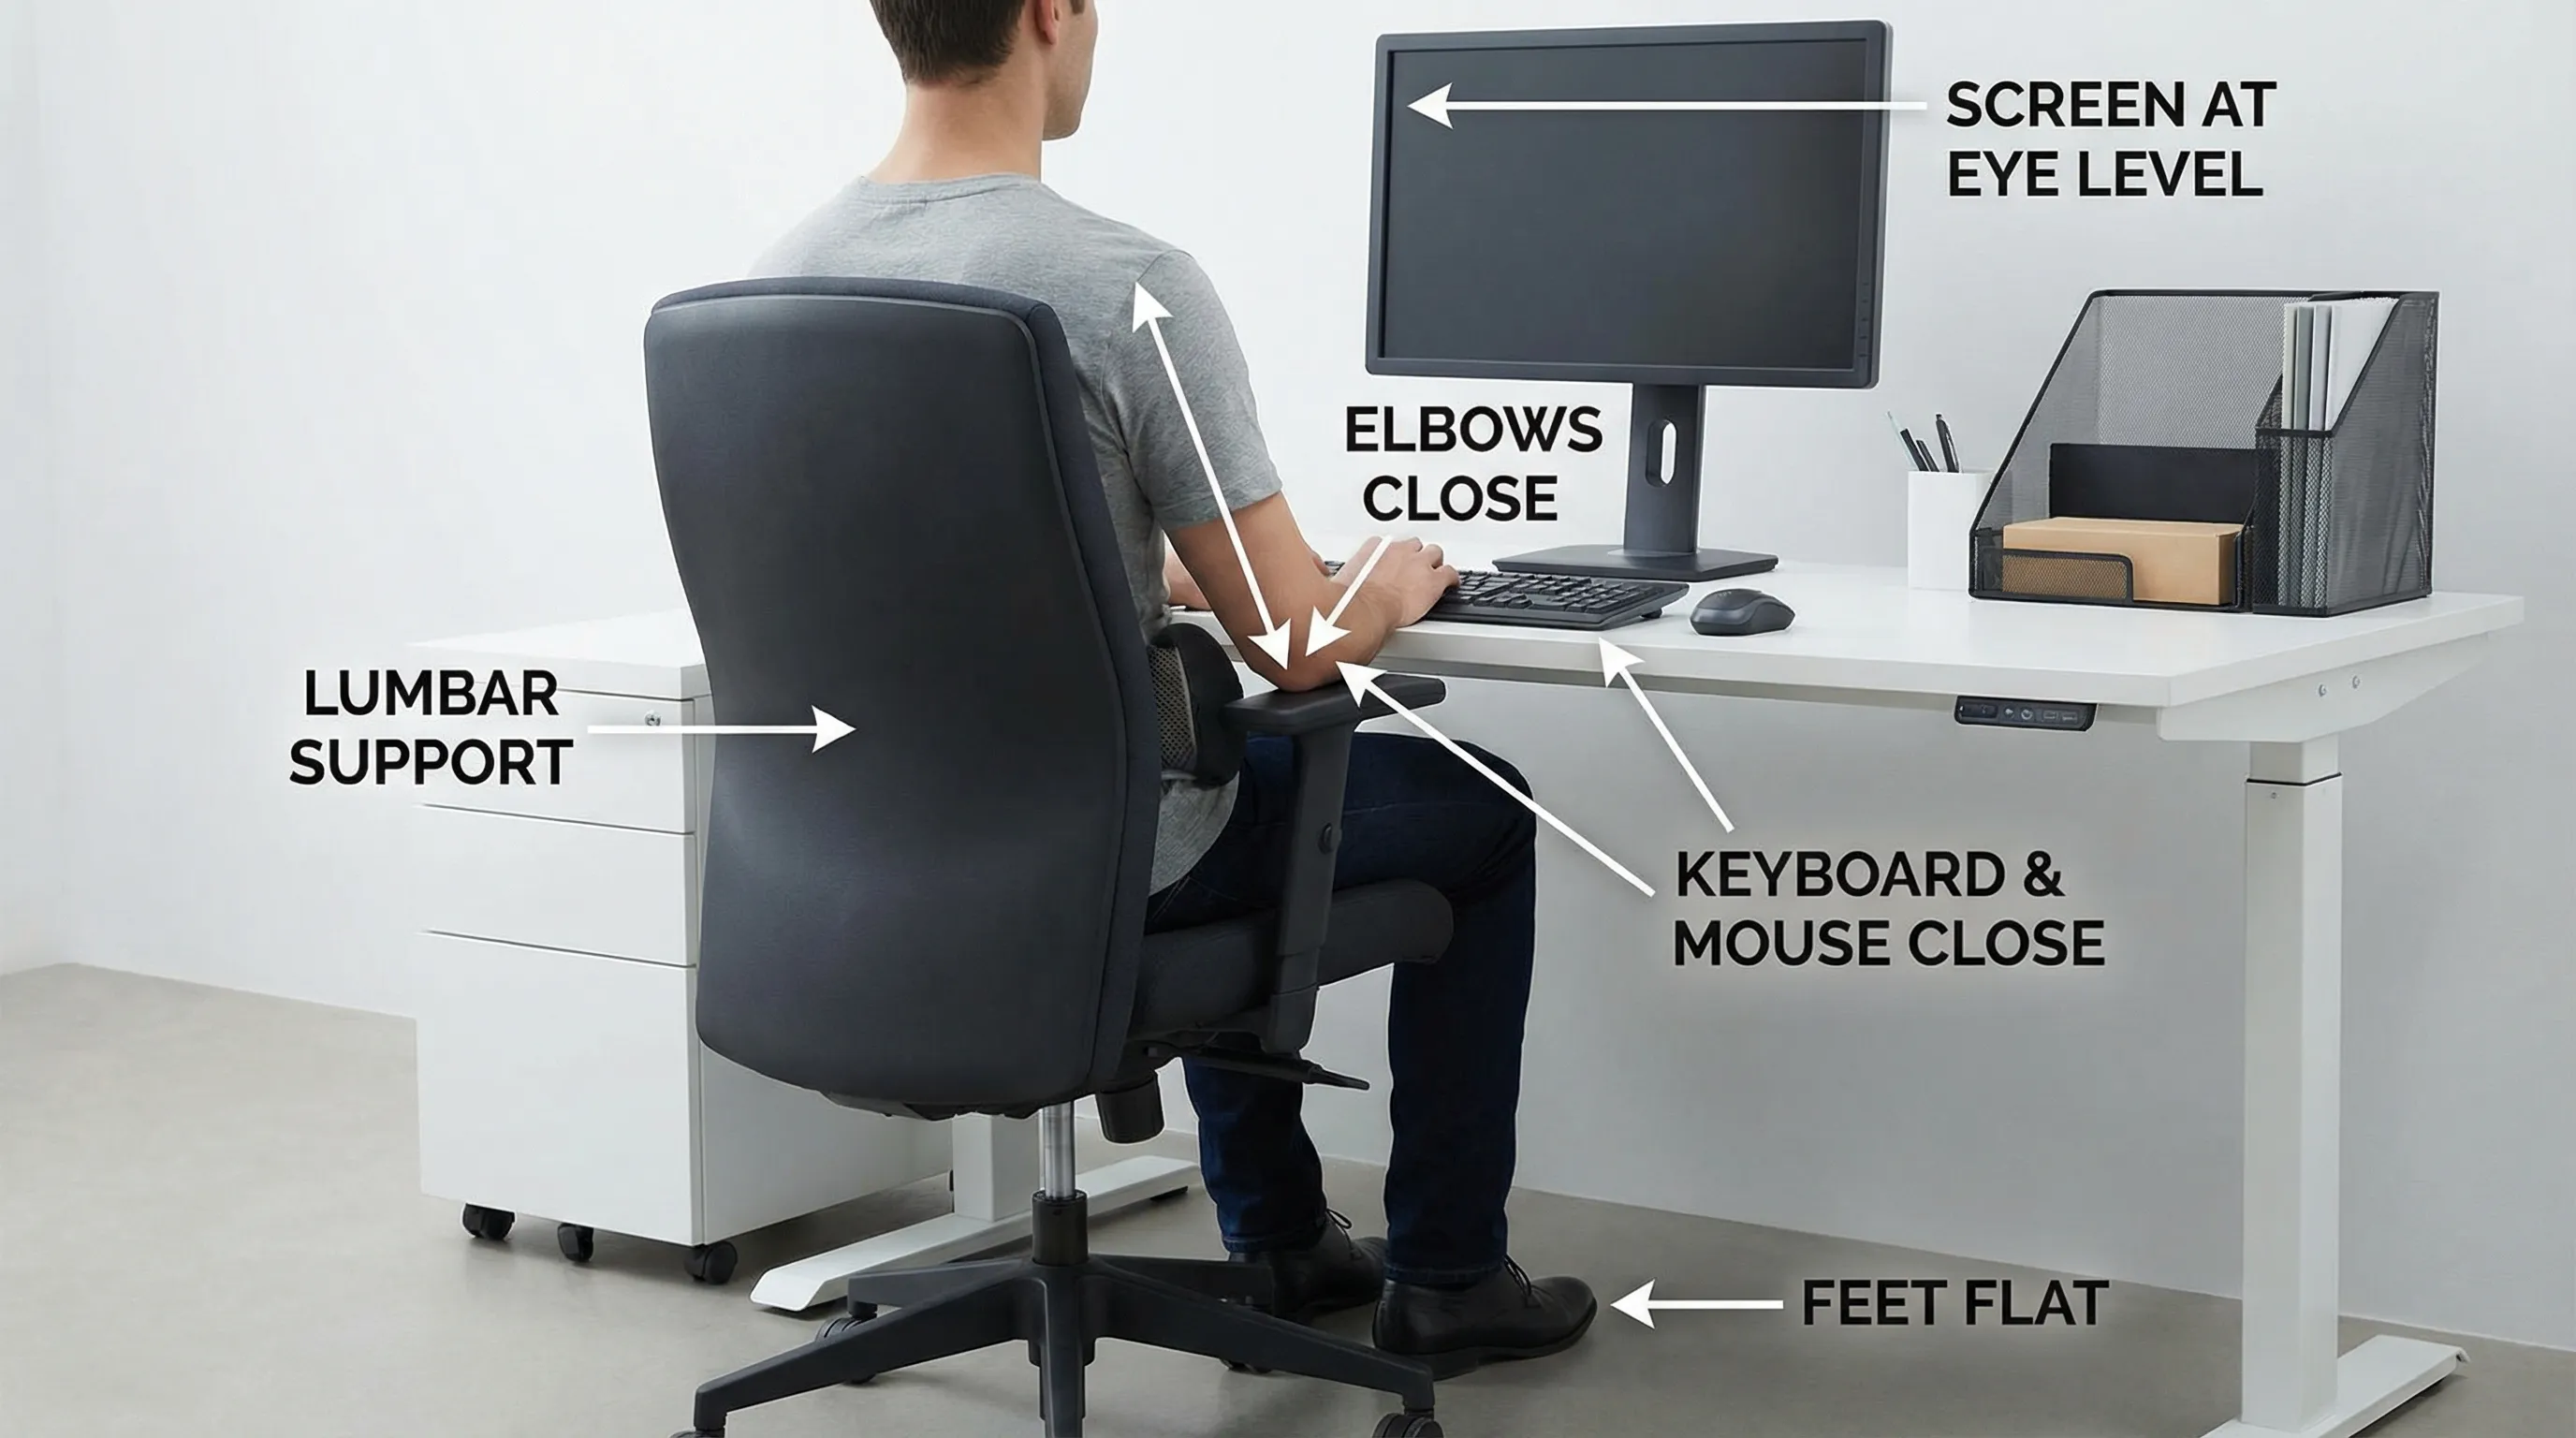
Minute 4: Move the keyboard closer (stop “reaching posture”)
A very common reason for a sore back after sitting is that the keyboard is too far away. That triggers a chain reaction: you reach, your shoulders round, your head comes forward, and your lower back collapses.
Bring the keyboard in so your elbows can stay near your sides. Your forearms should be supported by armrests (if useful) or by the desk without shrugging.
Minute 5: Place the mouse to match the keyboard
Put the mouse right next to the keyboard at the same height. If you have to reach sideways, the shoulder and upper back often compensate, which can spill into the low back over the day.
If you use a laptop trackpad and it forces your hands high and narrow, consider a separate mouse and keyboard for longer sessions.
Minute 6: Fix your screen height (reduce neck and upper back strain)
Screen position strongly influences head position. A forward head posture increases the load through the neck and upper back, and many people then “collapse” through the thoracic and lumbar spine.
Top of the screen should be around eye level.
Place the screen about an arm’s length away (adjust for comfort and vision).
If you work on a laptop, raise it on a stand or a stack of books, then use a separate keyboard and mouse if possible.
Minute 7: Centre your screen (stop twisting)
If your screen is off to one side, your spine and pelvis subtly rotate for hours. That can contribute to one-sided tightness around the QL (quadratus lumborum), hip flexors, and glutes.
Centre the screen to your nose. If you use two monitors, make the one you use most directly in front of you.
Minute 8: Check armrests (helpful, but often set wrong)
Armrests should reduce shoulder effort, not push your shoulders up.
Set them so:
your shoulders feel relaxed
your elbows can rest lightly at roughly desk height
If armrests stop you getting close to the desk, lower them or move them out of the way so you can sit back and keep the keyboard close.
Minute 9: Create a “neutral reach zone” for everyday items
Place your phone, notebook, water bottle, and anything you use frequently within an easy reach so you are not repeatedly leaning and twisting.
If you take calls, avoid cradling the phone between shoulder and ear. Use speakerphone or headphones.
Minute 10: Lock in one habit that keeps the setup working
Even a perfect setup will not hold if you sit in one position for long periods. Choose one simple habit you can actually stick to:
Stand up for 30 to 60 seconds every 30 to 45 minutes.
Alternate between sitting back (supported) and a more “active sit” posture.
Take calls standing when you can.
If you want a formal reference for workstation and posture basics, see the HSE DSE guidance.
Fast self-check: did you set it up correctly?
Use the table below as a quick pass/fail. If you fail one row, fix that item first, it is usually the highest leverage.
Setup item | What “good” feels like | Quick test you can do now | Common mistake that causes a sore back after sitting |
|---|---|---|---|
Feet and chair distance | Stable base, no sliding forwards | Feet flat, chair close enough that you do not reach | Chair too far from desk so you perch and lean |
Seat height | Hips supported, thighs not jammed upwards | Knees around hip level or slightly lower | Chair too low, pelvis tucks under and you slump |
Lumbar support | Lower back feels supported, not pushed | A small support at belt height feels “filling” | No support, sustained rounding through low back |
Keyboard and mouse position | Elbows near sides, shoulders relaxed | You can type with elbows close to body | Keyboard too far away, shoulders round forwards |
Screen height and distance | Neck feels long, head not jutting | Top of screen near eye level, about arm’s length away | Laptop low on desk, head cranes down all day |
Screen centred | Body faces forward, not twisted | Nose points to the centre of main screen | Monitor to the side, repeated rotation |
Common desk setups that look fine, but still cause back pain
“Laptop only” setup
A laptop on a desk tends to force a compromise: if the screen is at eye level, the keyboard is too high; if the keyboard is comfortable, the screen is too low. If you sit at a laptop for more than short bursts, a separate keyboard and mouse usually make a meaningful difference.
Sitting on a soft sofa or bed to work
Soft surfaces often let the pelvis roll backwards, flattening the lumbar curve and increasing strain through the low back over time. If you have to work from a sofa occasionally, use firm cushions behind your lower back and under your feet, and keep sessions short.
“I have a good chair, so I’m done”
A chair helps, but screen, keyboard distance, and habits usually matter just as much. Many people still get a sore back after sitting because the chair is fine but the desk is too high, the screen is off-centre, or the keyboard is too far away.
Two quick movements that reduce stiffness without leaving your desk
These are not a substitute for assessment, but they can help you de-load a stiff back between tasks.
Seated pelvic tilts (30 to 60 seconds)
Sit tall, then gently rock your pelvis forwards and backwards (like you are finding the middle). Keep the movement small and comfortable.
Sit-to-stand reset (5 reps)
Stand up and sit down slowly five times. Keep your feet planted and use your hips, not momentum. This can “wake up” glutes and reduce the feeling of being locked in the lower back.

When desk changes are not enough
Ergonomics is a strong first step, but it does not explain every case of back pain. If your sore back after sitting is persistent, recurring, or getting worse, it can help to look deeper at:
movement control (how your spine and hips share load)
breathing mechanics and ribcage position (often linked with mid-back stiffness)
hip mobility and glute strength (common contributors to overworking the lower back)
workload and recovery (sudden increases in sitting time, stress, poor sleep)
For general back pain guidance, the NHS overview of back pain is a helpful starting point, including when to seek further assessment.
How Versano Clinics can help
If you have adjusted your workstation and still feel a sore back after sitting, a tailored assessment can identify what is driving your symptoms and what to change first. Versano Clinics is a modern osteopathic clinic in Central London offering personalised care for pain relief, rehabilitation, and musculoskeletal wellbeing, with both in-person and virtual consultations available.
Depending on your needs, your clinician may focus on osteopathy or physiotherapy input, postural assessment and correction, chronic pain management strategies, rehabilitation planning, and hands-on options like deep tissue or sports massage. If convenience matters, same-day appointments and major insurance coverage can make getting started easier.
You can explore options or book via the Versano Clinics website.
